• Skip to main content
  • Skip to footer

Dr Jody Muelaner

simplifying complexity

  • Home
  • Writing
  • Design
  • Contact

Jody Muelaner

Early design verification of complex assembly variability using a hybrid – model based and physical testing – methodology

2011/08/14 by Jody Muelaner Leave a Comment

Design verification in the digital domain, using model-based principles, is a key research objective to address the industrial requirement for reduced physical testing and prototyping. For complex assemblies, the verification of the design intent and the associated production methods is currently fragmented, prolonged and sub-optimal, as it is based on the sequential consideration of various aspects in the digital and physical domains using a range of systems.
This paper describes a novel hybrid design verification methodology that integrates model-based verification analysis with the measurement data and plans derived from the physical testing of prototype assemblies, in order to facilitate the early verification of complex designs from the perspective of satisfying key assembly criteria.

Authors

Maropoulos, P.G., P. Vichare, O. Martin, J.E. Muelaner, M. Summers, and A. Kayani

Published in

CIRP Annals – Manufacturing Technology, 2011

Volume and page number information

60(1)

DOI

10.1016/j.cirp.2011.03.097.

Download

pdf icon

ALCAS 3DCS Model
ALCAS 3DCS Model

Filed Under: Quality Assurance

Design for Measurement Assisted Determinate Assembly (MADA) of Large Composite Structures

2011/08/04 by Jody Muelaner Leave a Comment

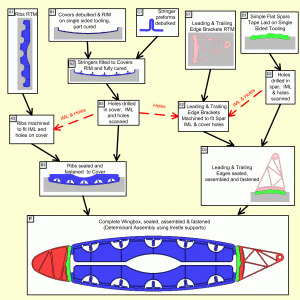
This paper describes how Measurement Assisted Determinate Assembly (MADA) can facilitate the lean production of aerospace structures, provided that the structure is designed for MADA. A novel wingbox design and production process is used to illustrate this. The aerospace industry has not benefited from the significant reductions in production cost and cycle time that can result from greater assembly efficiency, part-to-part interchangeability and the use of flexible automation. This is largely due to the very high accuracies required across large scale assemblies. The use of metrology can reduce process steps, reduce the reliance on costly hard tooling, reduce the requirement for manually intensive and time consuming re-working at late stages of assembly, and allow low cost flexible automation to place tools to the required accuracies. The generic MADA process is presented together with guidelines for the design of structures to enable MADA.

Download:

Authors

J E Muelaner, P G Maropoulos

Department of Mechanical Engineering, The University of Bath, Bath, UK

Published in

Coordinate Metrology Systems Conference 2010: Reno, Nevada

Official URL

www.cmsc.org

Measurement Assisted Determinate Assembly Conceptual Process for Aircraft Wing Box

Filed Under: Part-to-part assembly

Measurement Assisted Assembly and the Roadmap to Part-To-Part Assembly

2011/07/12 by Jody Muelaner Leave a Comment

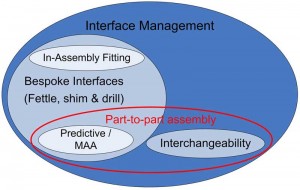
This paper gives a clear framework for achieving part-to-part assembly though the use of measurement assisted assembly. It explains why challenges encountered in industries such as aircraft and spacecraft production mean that traditional approaches such as interchangeability are not cost effective at bringing about part-to-part assembly. The alternative methods possible using measurement assisted assembly are shown to be more suitable in these industries. The further development of measurement assisted assembly is then presented as a roadmap to part-to-part assembly.

Note: My latest part-to-part assembly paper titled Achieving Low Cost and High Quality Aero Structure Assembly through Integrated Digital Metrology Systems was recently presented at the CMS 2013 Conference in Portugal.

Authors: J.E. Muelaner, A. Kayani, O. Martin, and P.G. Maropoulos (University of Bath and Airbus UK)

Proceedings of DET2011, 7th International Conference on Digital Enterprise Technology, 2011. Athens, Greece. p. 11-19

Abstact: Cycle times and production costs remain high in aerospace assembly processes largely due to
extensive reworking within the assembly jig. Other industries replaced these craft based processes
with part-to-part assembly facilitated by interchangeable parts. Due to very demanding interface
tolerances and large flexible components it has not been possible to achieve the required
interchangeability tolerances for most aerospace structures. Measurement assisted assembly
processes can however deliver many of the advantages of part-to-part assembly without requiring
interchangeable parts. This paper reviews assembly concepts such as interface management, oneway
assembly, interchangeability, part-to-part assembly, jigless assembly and determinate
assembly. The relationship between these processes is then detailed and they are organized into a
roadmap leading to part-to-part assembly.

Download: Download the full paper - Measurement Assisted Assembly and the Roadmap to Part-To-Part Assembly

Interface Management and Part-to-part Assembly

Filed Under: Part-to-part assembly

Concepts for and Analysis of a High accuracy and High Capacity (HAHC) Aerospace Robot

2011/06/25 by Jody Muelaner Leave a Comment

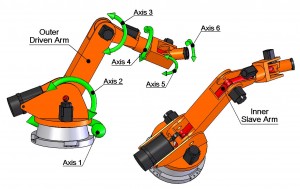
Case study work carried out within the aerospace sector has highlighted the requirement for highly accurate and high capacity robots in aerospace assembly; literature supports this observation. This paper presents the generic capabilities of such a system. These include the ability to rapidly locate itself within a large measurement volume using supplementary laser metrology systems, to carry out detailed inspection beyond the line of sight, and to accurately locate parts, drill holes and fettle interfaces. Concepts are presented for a standardized robot which would provide a flexible automation system able to carry out a full range of operations required in the assembly of large aerospace structures. Two possible solutions are detailed, one based on error mapping and one based on the physical isolation of encoders from structural loading using an exoskeleton approach.

Download:pdf icon

Authors

Muelaner, J.E., Z. Wang, and P.G. Maropoulos

Published in

IMechE, Part B: J. Engineering Manufacture, August 2011

Volume and page number information

255(8), p. 1393-1399

DOI

10.1177/0954405411406939

HAHC Robot Concept
HAHC Robot Concept

Filed Under: Automation

Review of Large Volume Metrology for Airbus NGCW

2011/03/25 by Jody Muelaner Leave a Comment

Introduction

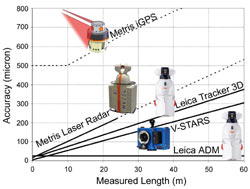
The Next Generation Composite Wing (NGCW) project is a £100M initiative led by Airbus to revolutionize aircraft wings in order to design, manufacture and test significantly lighter-weight and more eco-efficient aircraft. Jody Muelaner led a review of Large Volume Metrology Instruments covering instruments providing sub  millimeter measurement capabilities at scales of greater than 1 meter and typically in excess of 10 meters.

Graph of Instrument's Uncertainty against Range
Graph of Instrument’s Uncertainty against Range

Laser-Based Spherical Coordinate Measurement Systems

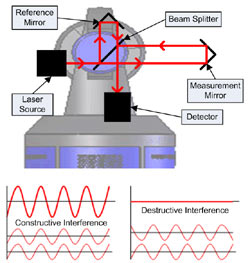
These systems combine laser ranging with two angle measurements to give coordinate measurements in 3 dimensions, such instruments include laser trackers and laser radar. The best state-of-the-art systems available (using multi-lateration) can achieve accuracy of 1 part in 106 of the measured range although 1 part in 105 is typical for coordinate measurements.

Principle of Operation for the Fringe Counting Interferometer in a Laser Tracker

Photogrammetry

Photogrammetry is essentially a theodolite network with cameras serving as automatic theodolites. Once a target has been located on a two dimensional image the direction of the target can then be determined from trigonometry. A major advantage of photogrammetry is that many points can be measured simultaneously. Accuracies of 1 part in 105 are typical.

Indoor GPS

Indoor GPS (iGPS) uses a number of transmitters around the working volume to fix the position of a single sensor. Communication from transmitter to sensor is one-way, so it is possible to have a large number of sensors simultaneously receiving signals and detecting their position. Accuracies of a few parts in 104 are typical.

Laser Projection

A point of laser light is rastered across an object to project templates and instructions for composite layup, painting, fitting bracketry etc. The laser projector is supplied with data describing the profiles to be projected, surfaces to project onto and reference features such as holes or corners. An integrated laser line scanner measures the reference features allowing the system to locate its-self within the virtual CAD environment before projection is carried out.

Filed Under: Case Study, Measurement

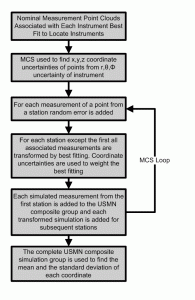
Estimation of Uncertainty in Three Dimensional Coordinate Measurement by Comparison with Calibrated Points

2010/11/25 by Jody Muelaner 1 Comment

This paper details a method of estimating the uncertainty of dimensional measurement for a three dimensional coordinate measurement machine. An experimental procedure was developed to compare three dimensional coordinate measurements with calibrated reference points. The reference standard used to calibrate these reference points was a fringe counting interferometer with a multilateration like technique employed to establish three dimensional coordinates. This is an extension of the established technique of comparing measured lengths with calibrated lengths. Specifically a distributed coordinate measurement device was tested which consisted of a network of Rotary-Laser Automatic Theodolites (R-LATs), this system is known commercially as indoor GPS (iGPS). The method was found to be practical and was used to estimate that the uncertainty of measurement for the basic iGPS system is approximately 1 mm at a 95% confidence level.

Authors

J E Muelaner, Z Wang, O Martin, J Jamshidi, P G Maropoulos

Department of Mechanical Engineering, The University of Bath, Bath, UK

Published in

Measurement Science and Technology, 2010

Accepted for Publication on 16/12/09

Volume and page number information

21 () 025106

Notes

Results given in this paper were obtained using the original Workspace software
and a typical 4 transmitter setup. Further testing has shown that uncertainty may
be reduced by using newer software versions, and more complicated configurations
with more hardware.

DOI

10.1088/0957-0233/21/2/025106

Download

Official URL:

http://www.iop.org/EJ/abstract/0957-0233/21/2/025106/

References

  1. Flack D 2001 Measurement Good Practice Guide No. 42: Q2
    CMM Verification (National Physical Laboratory)
  2. Muelaner J E, Wang Z, Jamshidi J, Maropoulos P G,
    Mileham A R, Hughes E B and Forbes A B 2008
    Uncertainty of angle measurement for a rotary-laser
    automatic theodolite (R-LAT) Proc. Inst. Mech. Eng. B
    223 217–29
  3. Hedges T M, Takagi H, Pratt T and Sobel M J 2003 Position Q3
    measurement system and method using cone math
    calibration US Patent 6535282
  4. Triggs B, Mclauchlan P, Hartley R and Fitzgibbon A 1999
    Bundle adjustment—a modern synthesis. Vision
    algorithms: theory and practice International Workshop on
    Vision Algorithms (Corfu, Greece)
  5. BSI 2002 Geometrical product specifications Q4
    (GPS)—acceptance and reverification tests for coordinate
    measuring machines (CMM)—part 2: CMMs used for
    measuring size BS EN ISO (10360-22002)
  6. ASME 2006 Performance evaluation of laser-based spherical
    coordinate measurement systems (B89.4.192006)
  7. Lau K, Hocken R and Haight W 1985 Automatic laser
    tracking interferometer system for robot metrology Proc.
    CIRP—Precision Engineering Conference (Interlaken,
    Switzerland) pp 100–2
  8. Richard S and Kendall B 2006 Chirped coherent laser radar
    system and method
  9. VDI/VDE-Gesellschaft Mess- und Automatisierungstechnik
    2002 Optical 3D measuring systems—imaging systems
    with point-by-point probing VDI/VDE 2634 part 2
  10. Anchini R, Di Leo G, Liguori C, Paolillo A, Pietrosanto A
    and Strazzullo G 2007 Metrological verification of 3D
    scanners: a preliminary approach SPIE –Int. Soc.Opt. Eng.
    (Bellingham WA, WA , United States, San Jose, CA, United
    States) p 649108, 98227–0010
  11. Schwenke H, Franke M, Hannaford J and Kunzmann H 2005
    Error mapping of CMMs and machine tools by a single
    tracking interferometer CIRP Ann. –Manuf. Technol.
    54 475–8
  12. BSI. 1995 General Metrology—part 3: Guide to the
    Expression of Uncertainty in Measurement (GUM) (PD
    6461–31995)
  13. Estler W T, Edmundson K L, Peggs G N and Parker D H 2002
    Large-scale metrology—an update CIRP Ann. – Manuf.
    Technol. 51 587–609
  14. Calkins J M 2002 Quantifying coordinate uncertainty fields in
    coupled spatial measurement systems mechanical
    engineering Virginia Polytechnic Institute and State
    University, Blacksburg p 226
USMN Instrument Location


Filed Under: Measurement

Measurability Characteristics Mapping for Large Volume Metrology Instruments Selection

2010/07/22 by Jody Muelaner Leave a Comment

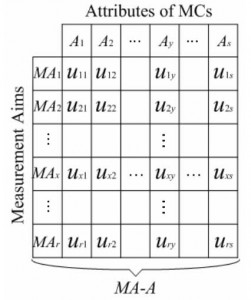
Measurement and verification of products and processes during the early design is attracting increasing interest from high value manufacturing industries. Measurement planning is deemed as an effective means to facilitate the integration of the metrology activity into a wider range of production processes. However, the literature reveals that there are very few research efforts in this field, especially regarding large volume metrology. This paper presents a novel approach to accomplish instruments selection, the first stage of measurement planning process, by mapping measurability characteristics between specific measurement assignments and instruments.

Download: pdf icon

Authors

Cai, B., W. Dai, J.E. Muelaner, and P.G. Maropoulos
Department of Mechanical Engineering, University of Bath, Bath, UK

Presented at

7th International Conference on Manufacturing Research, 2010, Warwick, UK

In: Proceedings of the Advances in Manufacturing Technology – XXIII

Volume and page number information

Pages 438-442

Measurability Characteristics Mapping

Filed Under: Measurement

The Metrology Enhanced Tooling for Aerospace (META) Framework

2010/07/16 by Jody Muelaner Leave a Comment

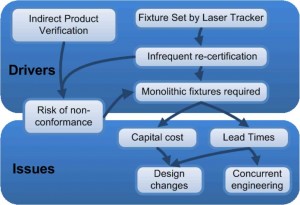
Aerospace manufacturers typically use monolithic steel fixtures to control the form of assemblies, this tooling is very expensive, has long lead times and has little ability to accommodate product variation and design changes. Since the tool setting and recertification process is manual and time consuming, monolithic structures are required in order to maintain the tooling tolerances for multiple years without recertification. This paper introduces the Metrology Enhanced Tooling for Aerospace (META) Framework which interfaces multiple metrology technologies with the tooling, components, workers and automation. This will allow rapid or even real-time fixture re-certification with improved product verification leading to a reduced risk of product non-conformance and increased fixture utilization while facilitating flexible fixtures.

Download:

Authors

O C Martin, J E Muelaner, P G Maropoulos

Department of Mechanical Engineering, The University of Bath, Bath, UK

Presented at

The 36th International MATADOR Conference

14th – 16th July 2010, Manchester, UK

Official URL

https://www.meeting.co.uk/confercare/matador2010/index.html

Issues caused by Traditional Build Philosophy

Filed Under: Quality Assurance

  • « Go to Previous Page
  • Page 1
  • Interim pages omitted …
  • Page 5
  • Page 6
  • Page 7
  • Page 8
  • Page 9
  • Page 10
  • Go to Next Page »

Footer

Terms and Conditions
Privacy Policy
  • Facebook
  • Twitter
  • Linkedin
  • Research Gate
  • Google+

Copyright © 2025 · Infinity Pro on Genesis Framework · WordPress · Log in